Friday, 19 January 2024

Azure DevOps Setup for Deploying Dynamics 365 F&O Package

Before delving into the creation of a deployment pipeline for Dynamics 365 Finance & Operations (D365FO), it is essential to establish a robust foundation. This involves setting up and installing necessary packages along with addressing specific pre-requisites. A well-prepared environment ensures a smooth and efficient deployment process, enhancing the overall effectiveness of the pipeline. This introduction will guide you through the crucial steps by steps required for the initial setup before embarking on the creation of the D365FO deployment pipeline.

Step:1 To begin, install the 'Dynamics 365 Finance and Operations Tools' from the Azure DevOps marketplace.


Step 2: Next, download the NuGet Packages from the LCS Shared Asset Library. Navigate to the NuGet packages tab and proceed to download the four packages corresponding to your Development environment's Platform Update version.


Step 3:
Download below packages:
a.       Application Build Reference (Microsoft.Dynamics.AX.Application.DevALM.BuildXpp.nupkg)
b.       Application Suite Build Reference (Microsoft.Dynamics.AX.ApplicationSuite.DevALM.BuildXpp.nupkg)
c.       Compiler Tools (Microsoft.Dynamics.AX.Platform.CompilerPackage.nupkg)
d.       Platform Build Reference (Microsoft.Dynamics.AX.Platform.DevALM.BuildXpp.nupkg)


Step 4:
Now navigate to your DevOps Project -> Artifacts -> Connect to Feed.


Step 5:
Click on NuGet.exe.
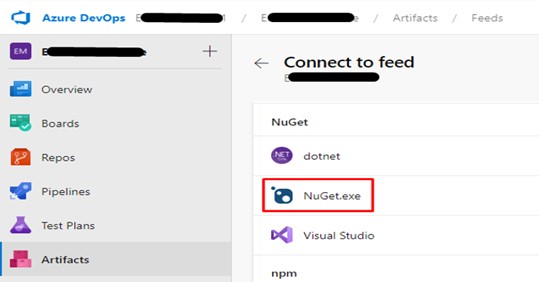


Step 6:
Create a nuget.config file by copying the highlighted section in the screenshot from DevOps provided below.


Step 7:
Now go back to the Artifacts window then click the gear icon to open the feed Settings.


Step 8:
In the Retention Policies section, check the box to enable package retention. Specify the Maximum number of versions per package and set the Days to keep recently downloaded packages. It's important to be aware that the available free storage space is limited to 2GB, and your configuration will impact storage costs. Click 'Save' upon completion.


Step 9:
Now download the latest exe NuGet from this link.

Step 10:
Now gather all the NuGet Packages and Config file in a folder.


Step 11:
Open CMD as Administrator, Run the command for navigate to downloads folder as: cd “C:\Users\<your username>\Downloads\NugetPackagesD365FO”.


Step 12:
Publish your NuGet packages by providing the package path, an API Key (any string will do) and the feed URL. To publish, run these commands in the Command Prompt window:
a.       nuget.exe push -Source “<xxxxx>” -ApiKey az Microsoft.Dynamics.AX.Application.DevALM.BuildXpp.nupkg
b.       nuget.exe push -Source “<xxxxx>” -ApiKey az Microsoft.Dynamics.AX.ApplicationSuite.DevALM.BuildXpp.nupkg
c.       nuget.exe push -Source “<xxxxx>” -ApiKey az Microsoft.Dynamics.AX.Platform.CompilerPackage.nupkg
d.       nuget.exe push -Source “<xxxxx>” -ApiKey az Microsoft.Dynamics.AX.Platform.DevALM.BuildXpp.nupkg

Note: Replace the source <xxxxx> above with the key from your nuget.config file.


Step 13:
When prompted for a password, type in the Personal Access Token (PAT) for the user instead of the normal password. Here’s a link to read more about PAT.


Step 14:
Now copy the version of four nuGet packages from the DevOps Artifacts as shown below.


Step 15:
Now create a file by the name "packages.config" and paste version which is copied from above step.


Here is the text of the above packages.config.

<?xml version=”1.0″ encoding=”utf-8″?>
<packages>
<package id=”Microsoft.Dynamics.AX.Platform.DevALM.BuildXpp” version=”7.0.6801.80″ targetFramework=”net40″ />
<package id=”Microsoft.Dynamics.AX.Application.DevALM.BuildXpp” version=”10.0.1515.81″ targetFramework=”net40″ />
<package id=”Microsoft.Dynamics.AX.ApplicationSuite.DevALM.BuildXpp” version=”10.0.1515.81″ targetFramework=”net40″ />
<package id=”Microsoft.Dynamics.AX.Platform.CompilerPackage” version=”7.0.6801.80″ targetFramework=”net40″ />
</packages>

Step 16:
Now the last step before creating the pipeline creation download the JSON template from github: xpp-classic-ci.json.

That's all. I trust this article proves to be beneficial for you.

Monday, 5 October 2020

Set up Online VM for Dynamics 365 Finance and Operation for Technical and Functional Learning Purposes

In this blog, I will discuss how we set up an online VM for D365F&O for Technical and Functional learning purposes for free.

Step: 1 Click this link to set up a free Azure VM. 


Step: 2 Sign-in with your email (outlook, live, or Hotmail). 


Step: 3
Provide your details. 


Step: 4
Select roles. (I have selected roles as per technical requirement)


Step: 5
Select your level.


Step: 6
Select products you have interested in.


Step: 7 Complete the setup.


When you completed the setup, launch VM mode as shown in the image.


When VM started Type Password as shown in the image.


After you type the password basic admin provisioning command will run as shown in the below image.


As you select the password, now select sign-in email and password as shown in the images.


That is all. You can now use this VM for technical and functional learning as you like.

Note: VM has a time limit for 4 hours. Also, there is no need to create another account after the VM is expired simply re-login with your existing account and you are good to go.


Monday, 28 September 2020

Get Batch Reserve Quantity with Item Id Unit Conversion

Below code will return batch reserve quantity with item id unit conversion, if you do not need unit conversion simply use without conversion method.

/// <summary>

    /// Get reserve physical Quantity

    /// </summary>

    /// <param name = "_salesLine">Sales line</param>

    /// <returns>Reserve physical Qty</returns>

    public InventQtyReservPhysical getReservedPhysicalQty(SalesLine  _salesLine)

    {

        InventQtyReservPhysical inventQtyReservPhysical;


        if(_salesLine!=null)

        {

            InventTable inventTable = InventTable::find(_salesLine.ItemId);

            inventQtyReservPhysical = decRound(UnitOfMeasureConverter::convert(_salesLine.reservedPhysical(),

            UnitOfMeasure::unitOfMeasureIdBySymbol(inventTable.inventUnitId()),

            UnitOfMeasure::unitOfMeasureIdBySymbol(_salesLine.SalesUnit),

            NoYes::No,

            InventTable::itemProduct(inventTable.ItemId),

            NoYes::No), 0);

        }

        return inventQtyReservPhysical;

    }


Tuesday, 18 February 2020

Upload file in azure storage account in D365FO

In this blog I will discuss how we can upload file in storage account in D365FO. We normally use azure storage account to hold thing that need to be further processed and stored on cloud.

Please see below code with explanation.

Explanation of source code (1.1):
  • Getting azure credentials from vend parameter tables.
  • Setting connection to access storage account.
  • Initialize cloud file client which used to configure and execute requests against the File service
  • Initialize cloud file share.
  • Check file share exists or not.


Explanation of source code (1.2):

  • Initialize cloud file directory which is directory of files which hold directories, and directories hold files.
  • Gets a reference to a virtual blob directory beneath this container.
  • Initialize cloud file.
  • Uploads a stream to a file. If the file already exists on the service, it will be overwritten.


Complete Source Code (Method):

/// <summary>
    /// Upload file to azure file storage
    /// </summary>
    /// <param name = "_fileContentInStream">File stream</param>
    /// <parmam name = "_folderName">Folder where file saves</param>
    /// <param name = "_fileName">File name</param>
    /// <returns>True or False</returns>
    public static boolean uploadFileToAzureFileStorage(System.IO.Stream _fileContentInStream , str _folderName, str _fileName)
    {
        try
        {
            //Getting azure credentials from vend parameter tables (in my case)
            VendParameters  vendParameter = VendParameters::find();

            //Setting connection
            Microsoft.WindowsAzure.Storage.Auth.StorageCredentials storageCredentials = new Microsoft.WindowsAzure.Storage.Auth.StorageCredentials("Your storage account name",
                "Your storage account access key");
            Microsoft.WindowsAzure.Storage.CloudStorageAccount storageAccount = new Microsoft.WindowsAzure.Storage.CloudStorageAccount(storageCredentials, true);
           
            //Provides a client-side logical representation of the Microsoft Azure File service.
            //This client is used to configure and execute requests against the File service.
            Microsoft.WindowsAzure.Storage.File.CloudFileClient fileClient = storageAccount.CreateCloudFileClient();
           
            //Represents a share in the Microsoft Azure File service.
            Microsoft.WindowsAzure.Storage.File.CloudFileShare share = fileClient.GetShareReference("Your file share name");

            //If not exist throw error
            if (!share.Exists(null, null))
            {
                throw error(strFmt("File share not exists."));
            }

            //Represents a directory of files which hold directories, and directories hold files.
            Microsoft.WindowsAzure.Storage.File.CloudFileDirectory cloudDir = share.GetRootDirectoryReference();

            container conFolders = str2con(_folderName, '/');

            for (int i = 1; i <= conlen(conFolders); i++)
            {
                str folderName = conpeek(conFolders, i);

                //Gets a reference to a virtual blob directory beneath this container.
                cloudDir = cloudDir.GetDirectoryReference(folderName);
                cloudDir.CreateIfNotExists(null, null);
            }

            //Represents a file in the Microsoft Azure File service.
            Microsoft.WindowsAzure.Storage.File.CloudFile file = cloudDir.GetFileReference(_fileName);

            //Have to run Seek on Stream.
            if (_fileContentInStream.CanSeek)
            {
                _fileContentInStream.Seek(0, System.IO.SeekOrigin::Begin);
            }

            //Uploads a stream to a file. If the file already exists on the service, it will be overwritten
            file.UploadFromStream(_fileContentInStream, null, null, null);

            return true;
        }
        catch
        {
            return false;
        }
    }

That is all you have to do to upload files on azure storage accounts.

Tuesday, 4 February 2020

How to Effectively analyze ETA for any D365F&O Technical Task

I personally, and I'm sure almost all of you, heard questions like "When would it be ready? Or When will you deliver this task?" So in this blog I will discuss how I estimates time to accomplish D365F&O technical tasks.

Understand Customer Requirement:

Giving an ETA without understanding the task is like "Not knowing the destination of the ship and you estimates how long the trip takes". So in first place understanding the customer's requirement is most important.

Order Your Activities:

At this stage, you don't need to add in how long you think activities are going to take. However, you might want to note any important deadlines. For example, you might need to get documentation of another component of the system before starting integration.

Breakdown Your Estimates (into):

Known knowns: 
How long will it take to do what you know how to do. 

Known unknowns: 
How long do you think it will take to do what you don't know how to do.

Unknown unknowns: 
This is the real time black hole. Provide a range for the estimate with justification based on the risks you anticipate.

Offer to adjust the estimate and certain milestones along the way. Any "unknown unknowns" will become "known unknowns", the "known unknowns" should become "known knowns" as you gain experience, and the estimate of you "known knowns" can be adjusted based on progress to date. You can do an initial estimate, then re-estimate when you about 25% done, then again at 50%, then again at 85%. At each milestone your estimate should start converging on the actual time the tasks will take.

ETA Should Contains (as per the requirement from the client):

  • FDD Review
  • Development analysis
  • Coding
  • Run best practices + proper comments where needed
  • Unit testing
  • Quality assurance
  • Documentation (FRD, FDD, TDD, Test Cases, Release notes, Deployment document)
  • Code review
  • Build and Sync
  • Code merge or check-ins
  • Deployment (creating deployable package, deploying on other environments e.g., QA, CRP, UAT, Gold)
Examples For ETA:

Example # 1 - In this example ETA is not detailed or descriptive.


Example # 2 - 
In this example ETA it is much detailed or descriptive.


That is all, I believe this blog will add a value in your programming.

Tuesday, 23 July 2019

How to check if your customers received their invoices via email in D365FO

One way to check if your customers got your email with the invoice attached is to request a read receipt for the sent email message. While a delivery receipt confirms delivery of your email message to the recipient's mailbox, a read receipt confirms that the recipient opened the message.

Note: In Outlook, the message recipient can also decline to send read receipts.

In this article, I will explain how to set up and use Read receipt using the Docentric free tool. Please follow step by step process.

Step: 1

In Docentric report setup (Organization administration -> Docentric AX -> Reports) select the report for which you want to specify the additional parameters related to the emailing process. Click the Settings > Email sending settings button, which opens the Email sending settings form for the selected report.

Note:
For this article example I am using the SalesInvoice.Report.


Step: 2

In the Read and Delivery receipts, Message Priority tab you can configure few more per-report and per-company settings of email fields and parameters that are not available on the Print destination settings form.

Here we can configure Read receipt address by specifying the email address at which you want to get the read receipts when emailing the report. If you leave this field empty, then no receipt will be requested from email recipients. You can enter a valid email address or the @FROM_ADDRESS@ placeholder, in which case a read receipt will be sent to the sender of the email.


That is all you need to set up in order to start receiving read receipts at your configured email address for invoices that reach their email recipients.


Now let’s email the Customer invoice report and check how the whole process looks like. Assume that Print management is configured to email invoices. Open Invoice journal and click Use print management.


When an email with the attached invoice is received, and the recipient tries to open it and read it, an Outlook’s message pops up to ask should a read receipt be sent. If the recipient clicks Yes, an automatic email will be sent to Read receipt address – in my case Tabshir@live.com that I have set up above in the Docentric report setup > Email sending settings form.


Monday, 24 June 2019

Printing Invoices to Attachments of Sales order, Journal or Customer in D365FO

If you print the Sales invoice report to the built-in File print destination, you cannot get much except for downloading the output report in the browser. Consequently, you cannot use this print destination in batch either. We had the requirement from our client to email invoices but also to save them to Attachments of the related sales order, all that performed in batch during the posting. We managed to achieve this scenario using the Docentric free-edition tool that offers printing reports to Attachments (also in batch) OOTB.

In this article I will explain how to print Sales invoice to Attachments of the related sales order, customer or journal using Docentric File print destination. Everything else (emailing invoices + saving them to Attachments) can be done via built-in Print management setup.

Note: Navigation for printing Sales invoices (Accounts receivable -> Inquiries and reports -> Invoices -> Invoice journal).

Let us see step by step process:

Step: 1

We need to set up Print management setup to point to Docentric File print destination for customer invoice (Accounts receivable -> Setup -> Forms -> Form setup -> General (tab) -> Print management (option)).


Step: 2


In “Output filename and format” section we need to set Output format to PDF also I am going to set filename.

Note: Docentric tool provides the possibility of using placeholders such as @InvoiceId@ or @InvoiceAccount@ in the output filename. Moreover, you can use report specific placeholders in all print destination settings including email body, subject, SharePoint target folder, etc.


Step: 3


In the final step, in Save to Attachments section do the following settings.
  1. Save to attachments checkbox should be set to Yes.
  2. Select File as Document type.
  3. Select Source table as Record type.


That is all it takes to setup printing Invoices to Attachments of the corresponding sales order.

If you want to attach invoices to the corresponding journal or customer records, you should select Journal or Account table as Record type on the Print destination settings form.

Now let’s run the customer invoice report. For this example, I am going to print the invoice (CIV-000233) for the sales order (0002340).


After running the report, attachment will be saved at sales order end, you can see it in below image.

Final result:


Create a Purchase Order from a Sales Order Using PurchCreateFromSalesOrder Framework in X++ | D365 F&O

In Dynamics 365 Finance & Operations, you may need to automatically create a Purchase Order from a Sales Order for scenarios such as int...