Thursday 25 January 2024

Focus on Troubleshooting

This post is intended for those who have started their career in D365FO as Technical Consultants.

In my experience, the approach to programming a from-scratch application differs from working on an already-built product with thousands of lines of code. Since we work on D365FO, which has an extensive codebase, our approach varies from starting development from scratch.

When working on a product, the key skills that should be emphasized are debugging and troubleshooting. The ability to find errors efficiently is crucial. In my view, to excel in Dynamics as a technical consultant, focusing on debugging is essential. You need to understand where the backend code for forms or reports, which run on the user interface, is located. Learn to backtrack from there, and if an issue arises, understand how to debug it. For instance, in the "info" class "add" method, all the info, warnings and errors are generated throughout Dynamics. By placing breakpoints and using the call stack, backtrack to understand the flow of the code.

Repeating this process of debugging will enhance your debugging skills, providing a better understanding of the Dynamics backend structure. The more you engage in debugging, the clearer your understanding of Dynamics will become, leading to improvement in your overall skills.

I hope that this will be beneficial advice. 🙂

Monday 22 January 2024

Benefits and Usage of 'Add Developer Placeholder' Option in D365FO Task Recorder

Function: The "Add Developer Placeholder" feature in Dynamics 365 Finance and Operations is a powerful tool within the Task recorder functionality. Its primary function is to allow users to insert a placeholder step into the recorded steps list. Unlike other steps, the placeholder step remains discreet during task guide viewing, playback, and maintenance of a recording. This feature essentially acts as a silent note to developers without cluttering the user interface or affecting the recorded process.

Reference: Microsoft Dynamics 365 Documentation


Usage and Benefits: The utility of the "Add Developer Placeholder" option becomes apparent in scenarios where a recorded process demands custom development or additional logic beyond the standard capabilities of Task recorder. For instance, if a step requires data validation or specific calculations not inherent to the standard business process, the placeholder serves as a virtual signpost. By incorporating these placeholders, users effectively communicate to developers that certain elements of the recorded process necessitate further customization.

Reference: Task Recorder Quick Reference

This functionality ensures a seamless collaboration between users and developers, streamlining the customization process by providing clear insights into the specific requirements. The "Add Developer Placeholder" feature thus stands as a testament to the user-centric design philosophy of Dynamics 365 Finance and Operations, offering a nuanced solution for businesses seeking both efficiency and customization in their workflows.

D365FO Effortless Deployments: Building Your DevOps Pipeline

In this blog, we will explore the creation of a pipeline to automate the process of generating deployable packages in DevOps. This method of creating deployable packages is not only swift but also time-saving. It eliminates the need to manually build and sync your models, allowing for automated package creation. Furthermore, it sparing you the effort of manually executing each step.

Before we get started make sure that pre-requisite nuGet packages and relevant components are added to your VM from where you want to connect your pipeline for deployable package.

If it is not installed, check it out this blog (Azure DevOps Setup for Deploying Dynamics 365 F&O Package).

Note: The folder paths provided below are according to my environment. Please fill in the folder path according to your setup.

Step-1:
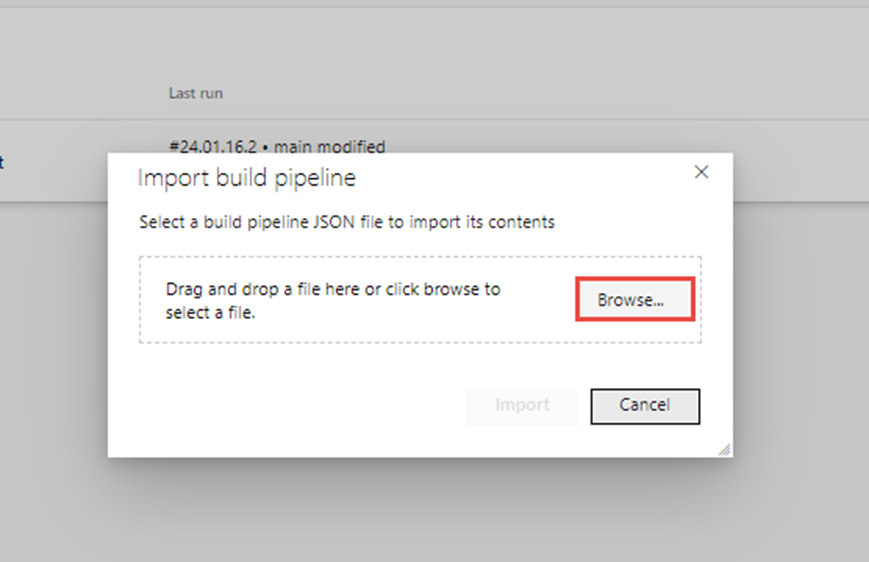
Open DevOps and click on "Pipelines," then select "Import Pipeline" as attached below.

Note: Download pipeline.


Step 2:
Browse the pipeline provided by Microsoft to upload the relevant resources.


Step 3:
After importing the JSON file, it will create resources. Now, you just need to fill in the values highlighted in the screenshots below, according to your project's naming conventions.

Note: Fill in only the highlighted fields and leave the remaining fields blank.


Note: When you imported the pipeline above, below resource was not added. You need to add this manually by clicking on the "+" (add) sign. Click it and add the "Copy Files" resource.


Step 4:
Save your pipeline. You can also choose to save and run the pipeline simultaneously, as demonstrated below.


Pipeline is successfully created and you now can run it as show in below image.


That is all you need to do. Cheers!

Friday 19 January 2024

Azure DevOps Setup for Deploying Dynamics 365 F&O Package

Before delving into the creation of a deployment pipeline for Dynamics 365 Finance & Operations (D365FO), it is essential to establish a robust foundation. This involves setting up and installing necessary packages along with addressing specific pre-requisites. A well-prepared environment ensures a smooth and efficient deployment process, enhancing the overall effectiveness of the pipeline. This introduction will guide you through the crucial steps by steps required for the initial setup before embarking on the creation of the D365FO deployment pipeline.

Step:1 To begin, install the 'Dynamics 365 Finance and Operations Tools' from the Azure DevOps marketplace.


Step 2: Next, download the NuGet Packages from the LCS Shared Asset Library. Navigate to the NuGet packages tab and proceed to download the four packages corresponding to your Development environment's Platform Update version.


Step 3:
Download below packages:
a.       Application Build Reference (Microsoft.Dynamics.AX.Application.DevALM.BuildXpp.nupkg)
b.       Application Suite Build Reference (Microsoft.Dynamics.AX.ApplicationSuite.DevALM.BuildXpp.nupkg)
c.       Compiler Tools (Microsoft.Dynamics.AX.Platform.CompilerPackage.nupkg)
d.       Platform Build Reference (Microsoft.Dynamics.AX.Platform.DevALM.BuildXpp.nupkg)


Step 4:
Now navigate to your DevOps Project -> Artifacts -> Connect to Feed.


Step 5:
Click on NuGet.exe.


Step 6:
Create a nuget.config file by copying the highlighted section in the screenshot from DevOps provided below.


Step 7:
Now go back to the Artifacts window then click the gear icon to open the feed Settings.


Step 8:
In the Retention Policies section, check the box to enable package retention. Specify the Maximum number of versions per package and set the Days to keep recently downloaded packages. It's important to be aware that the available free storage space is limited to 2GB, and your configuration will impact storage costs. Click 'Save' upon completion.


Step 9:
Now download the latest exe NuGet from this link.

Step 10:
Now gather all the NuGet Packages and Config file in a folder.


Step 11:
Open CMD as Administrator, Run the command for navigate to downloads folder as: cd “C:\Users\<your username>\Downloads\NugetPackagesD365FO”.


Step 12:
Publish your NuGet packages by providing the package path, an API Key (any string will do) and the feed URL. To publish, run these commands in the Command Prompt window:
a.       nuget.exe push -Source “<xxxxx>” -ApiKey az Microsoft.Dynamics.AX.Application.DevALM.BuildXpp.nupkg
b.       nuget.exe push -Source “<xxxxx>” -ApiKey az Microsoft.Dynamics.AX.ApplicationSuite.DevALM.BuildXpp.nupkg
c.       nuget.exe push -Source “<xxxxx>” -ApiKey az Microsoft.Dynamics.AX.Platform.CompilerPackage.nupkg
d.       nuget.exe push -Source “<xxxxx>” -ApiKey az Microsoft.Dynamics.AX.Platform.DevALM.BuildXpp.nupkg

Note: Replace the source <xxxxx> above with the key from your nuget.config file.


Step 13:
When prompted for a password, type in the Personal Access Token (PAT) for the user instead of the normal password. Here’s a link to read more about PAT.


Step 14:
Now copy the version of four nuGet packages from the DevOps Artifacts as shown below.


Step 15:
Now create a file by the name "packages.config" and paste version which is copied from above step.


Here is the text of the above packages.config.

<?xml version=”1.0″ encoding=”utf-8″?>
<packages>
<package id=”Microsoft.Dynamics.AX.Platform.DevALM.BuildXpp” version=”7.0.6801.80″ targetFramework=”net40″ />
<package id=”Microsoft.Dynamics.AX.Application.DevALM.BuildXpp” version=”10.0.1515.81″ targetFramework=”net40″ />
<package id=”Microsoft.Dynamics.AX.ApplicationSuite.DevALM.BuildXpp” version=”10.0.1515.81″ targetFramework=”net40″ />
<package id=”Microsoft.Dynamics.AX.Platform.CompilerPackage” version=”7.0.6801.80″ targetFramework=”net40″ />
</packages>

Step 16:
Now the last step before creating the pipeline creation download the JSON template from github: xpp-classic-ci.json.

That's all. I trust this article proves to be beneficial for you.

Key Updates in Dynamics 365 F&O for Version 10.0.39

Here’s a concise summary of the  platform updates  in  Microsoft Dynamics 365 Finance & Operations version 10.0.39 (March 2024) : 1- Add...