Before delving into the creation of a deployment pipeline for Dynamics 365 Finance & Operations (D365FO), it is essential to establish a robust foundation. This involves setting up and installing necessary packages along with addressing specific pre-requisites. A well-prepared environment ensures a smooth and efficient deployment process, enhancing the overall effectiveness of the pipeline. This introduction will guide you through the crucial steps by steps required for the initial setup before embarking on the creation of the D365FO deployment pipeline.
Step:1 To begin, install the 'Dynamics 365 Finance and Operations Tools' from the Azure DevOps marketplace.


Step 2: Next, download the NuGet Packages from the LCS Shared Asset Library. Navigate to the NuGet packages tab and proceed to download the four packages corresponding to your Development environment's Platform Update version.

Step 3:
Download below packages:
a.
Application Build Reference
(Microsoft.Dynamics.AX.Application.DevALM.BuildXpp.nupkg)
b.
Application Suite Build
Reference (Microsoft.Dynamics.AX.ApplicationSuite.DevALM.BuildXpp.nupkg)
c.
Compiler Tools
(Microsoft.Dynamics.AX.Platform.CompilerPackage.nupkg)
d.
Platform Build Reference
(Microsoft.Dynamics.AX.Platform.DevALM.BuildXpp.nupkg)
Step 4:
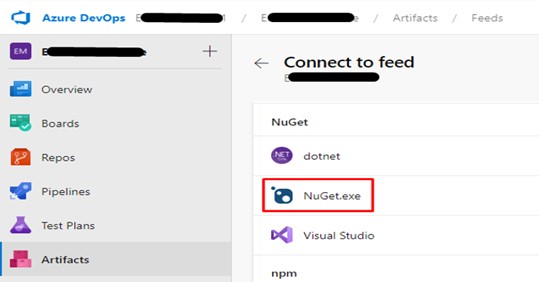
Now navigate to your DevOps Project -> Artifacts -> Connect to Feed.
Now navigate to your DevOps Project -> Artifacts -> Connect to Feed.

Step 5:


Click on NuGet.exe.
Step 6:
Create a nuget.config file by copying the highlighted section in the screenshot from DevOps provided below.

Step 7:


Now go back to the Artifacts
window then click the gear icon to open the feed Settings.

Step 8:
In the Retention Policies section, check the box to enable package retention. Specify the Maximum number of versions per package and set the Days to keep recently downloaded packages. It's important to be aware that the available free storage space is limited to 2GB, and your configuration will impact storage costs. Click 'Save' upon completion.

Step 9:
Now download the latest exe NuGet from this link.
Step 10:
Now gather all the NuGet Packages and Config file in a folder.
Now gather all the NuGet Packages and Config file in a folder.

Step 11:
Open CMD as Administrator, Run the command for navigate to downloads folder as: cd “C:\Users\<your username>\Downloads\NugetPackagesD365FO”.
Open CMD as Administrator, Run the command for navigate to downloads folder as: cd “C:\Users\<your username>\Downloads\NugetPackagesD365FO”.

Step 12:
Publish your NuGet packages by providing the package path, an API Key (any string will do) and the feed URL. To publish, run these commands in the Command Prompt window:
Publish your NuGet packages by providing the package path, an API Key (any string will do) and the feed URL. To publish, run these commands in the Command Prompt window:
a.
nuget.exe push -Source
“<xxxxx>” -ApiKey az
Microsoft.Dynamics.AX.Application.DevALM.BuildXpp.nupkg
b.
nuget.exe push -Source
“<xxxxx>” -ApiKey az
Microsoft.Dynamics.AX.ApplicationSuite.DevALM.BuildXpp.nupkg
c.
nuget.exe push -Source
“<xxxxx>” -ApiKey az Microsoft.Dynamics.AX.Platform.CompilerPackage.nupkg
d.
nuget.exe push -Source
“<xxxxx>” -ApiKey az Microsoft.Dynamics.AX.Platform.DevALM.BuildXpp.nupkg
Note: Replace the source
<xxxxx> above with the key from your nuget.config file.

Step 13:
When prompted for a
password, type in the Personal Access Token (PAT) for the user instead of the
normal password. Here’s a link to read more about PAT.

Step 14:
Now copy the version of four nuGet packages from the DevOps Artifacts as shown below.

Step 15:
Now create a file by the name "packages.config" and paste version which is copied from above step.

Here is the text of the above packages.config.
<?xml version=”1.0″ encoding=”utf-8″?>
<packages>
<package
id=”Microsoft.Dynamics.AX.Platform.DevALM.BuildXpp” version=”7.0.6801.80″
targetFramework=”net40″ />
<package
id=”Microsoft.Dynamics.AX.Application.DevALM.BuildXpp” version=”10.0.1515.81″
targetFramework=”net40″ />
<package
id=”Microsoft.Dynamics.AX.ApplicationSuite.DevALM.BuildXpp”
version=”10.0.1515.81″ targetFramework=”net40″ />
<package
id=”Microsoft.Dynamics.AX.Platform.CompilerPackage” version=”7.0.6801.80″
targetFramework=”net40″ />
</packages>
Step 16:
Now the last step before creating the pipeline creation download the JSON template from github:
xpp-classic-ci.json.
That's all. I trust this article proves to be beneficial for you.

No comments:
Post a Comment